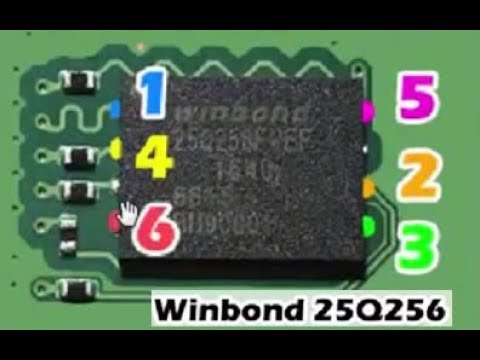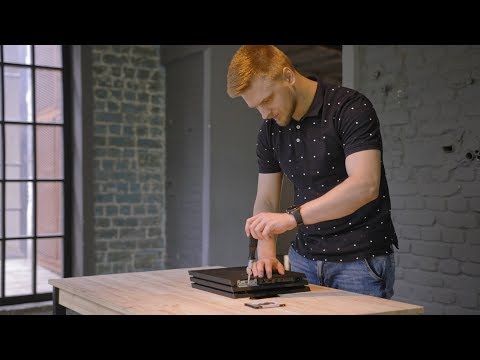
hello what such welcome fellow friends again to I am here of turn after this small stop had to to reasons of work is acting a absent times but already has gone back and eat it goes being usual want to command the greeting to all the subscribers of the channel also to the new subscribers to which invited to that join to the channel youtube to be able to receive notifications of new tutoriales leave comments ask etcetera also how no without forgetting us of command the greeting to our sponsor no center well going back to what is the subject of the tutorial been only go to do is teach us to do a better aesthetic in our playstation 3 slim could say that this is the second part in a tutorial that went up some months backwards where teachs to do what is one improvement in the system of ventilation that it is what see in the image which did an orifice of 80000 metres placed a metallic clay of the be possible a filter of carbon but well it would be optional in this occasion touches him to the aesthetics which go to achieve light the orifice of entrance of air the entrance of the disks and also the connections went if no tenés it it entrance and afterwards at all central in the that it is the entrance of the disks and the connections usb also comments a thing when it works with voltage it is necessary to have a lot of a lot of care because any small error it could repercutir in a grave problem even remain us without console and that it have evidence that to have a lot of care because we do not go us to do managers of at all here the responsibility recae on the person that manipulates the machine this case you very said this as at all we go to hold the things that are necessary first clear is an aunt goes him to be possible that feed of 12 volts also it could also it could use the one who is of 5 volts but clear the points of 5 volts they are much more hid necessary that there is much more work if we use the one of 12 volts is so simple eat use the commission of the fan and simple to locate and goes us to save a lot of work afterwards also it goes to be necessary use what is wire this case I I recommend grappin that is this that see in the image and if you do not have of east type of meat as something that was end and what narrower better because afterwards to the hour to manipulate what it install it goes to be much easier well that more does fault also a gun of hot silicone or plastic melted that you see it in the image if you do not have of this as you can use adhesive strip of double expensive and calls as insulating strip what happens in the insulating strip if the console heats a lot can give the case that despegue and could do some short some damage in the interior of the machine but well this already it would be an ours decision in this case I with me recommend plastic melted hot silicone that more as I think that already is everything to the following would be to remove what is it covers it upper of our machine I already have dreamed it is so simple eat city of the peace upwards but good for those that do not have clear east point as here up the corner upper right I go to leave a link where want a tutorial where taught how can open it disassemble what is one playstation 3 slim with one have already here it is what is covers it of the console go to see as it is the image also is necessary to comment one important thing because of the different models of playstation 3 slim that system it can give the case that find two types of interiors see in the image that this belongs to the model 120 gigas 250 and I think that the 320 also and afterwards we go to find this another that is the one of 160 gigas that can see that for the moment the fan already is smaller and afterwards this sheet also changes of colour this is a cromado the another is a grey a bit clear in this model the thing goes to change a lot because it is necessary do more work due to the fact that this piece of plastic is so together hit what is covers it upper that when we put you read it looking to up automatically it cancels what is the illumination therefore it is necessary to do it of form distinct we had to do three ofició with a taladro 3 here three here and put the that it is the group of led looking to asia then the light would give the gaps of the that it is the fan this on the one hand and afterwards here the same we had to españa is to do a small hole here and put it also invested and like this the light it would see inside what is elect this on the one hand if we have of this model as the thing changes a lot due to the fact that here we can see as if it was a relief more or less a centimetre then the modules of led could put in surface because of what is the relief of a centimetre so much the expected as in this said this as we go to go preparing the that they are the four groups of leds then we go to leave to a side what they are the consoles for the moment now what go to do will be prepare what are the groups of led that as you can see as in this throws it goes in groups of three sets that is to say here we can cut here here here continuously to the end we do not go to do four as we go to cut now to prepare them we go to put them a poquito of tin for afterwards already we have them prepared and now yes that go to begin to position what are the groups of led to position it that they are the groups of we go it to do of the following form will have to the discovered what is the adhesive strip that are used to to bring the star led and go to put them in this position do not put it here ace the laws [Music] well as we already have it has positioned three groups of led now it would be missing the most difficult also I want to comment a thing important is to take it into account when you have to join the groups to give us account that they always go signalled with a more or less that is to say positive and negative is very important not investing what is the polarity because we could damage surely the led or even the console this have it very in account here you will be able to it does not see in the image less a mayas and continuously is as we are one chain do not have positioned these three groups of led I recommend put them a drop of hot silicone especially in case it gives the case that it arrives to despegar what is the one of his son that has 3 of this form already had them assimilated well we go with the reader desconectamos now we would remove these three screws [Music] these two of here below depending the reader that have as it was to the case that any of the screws changes the position but well remove covers it upper metallic is it difficult no have upwards first here and now yes good as having the reader of the following form now we have to do a small orifice in this this piece of here have a taladro also it is convenient as try separate the top for no case that the taladro traspase as it noticed that the inferior part we raise a poquito are now it is we give it I already know it know the small discount that say been able to to remain like this but if we already go to fix what is the group of lens but first is necessary to put the wire because as this has invested we do not go to have ease to solder then the first go to put like this more or less we measure by where we go there of the wire but if we want already we can fix what it is it throws it people the wired up the one who have a lot of care no that they do not stick and I tripped with this piece of here that is to say go to carry it precisely with this side like this we go to leave the wired up of such way that do not disturb with this piece now the following will be to solder the last group of let's important remember which is the positive by the negative I have left them in such a way that the shortest is negative and the more long is positive so we go to go putting the wire his place and well now it touches to close what selectoras the [Music] already we have to go placing everything in his place now we go with the most delicate part it is the one who go to have to cut more that cut go to say litigate a bit the insulator of the wire here we have three black colours grey and brown the brown is the positive and the black in negative we take a for wires and remove him a poquito the insulator without arriving to cut what is the wire go us with the black and the now go him to add a poquito odd already we have and well already finally it is join what is the last extreme of the groups of led in what it is the one of the wired up of the fan to tibú with the black and the positive with the muzzle we want it now what go to do it is to isolate what is the welding can use integral and used silicone hot is faster [Music] well already we have it everything now go to go closing neither will do it with a beautiful ciao install us have cleaned him also a poquito the bank and well one so important thing for the people that had installed a late inside the reader take into account that the guardapolvos that have in the frontal it is necessary to remove it because because it cancels by complete what is the illumination and no you concern you by this because at all it can be that a pelín more than dust that is not minimum if you do not concern you thus towers removing this go to see an effect very very well but afterwards already it is not the one who more also in the first minute since we did did one entrance of air and put him a filter of coal that is this covers that have here that occurs that the filter of carbon also costs a lot it that it is the exit of light does us one proof but is that it is not really no it sees almost but what go to use this case will be this type of covers apart from being much more beautiful by the logo that have put of the dragon also we have substituted what is the filter of carbon by a rejilla very fine which does not go to obstruct hardly it that it is the step and go to do what is the proof we have to be much better so said this go to begin to mount the console and now already touch and do what it is the proof of the illumination leds and at all of light so we go to them [Music] [Music] [Music] [Music] well as we already have seen the effect that it does the illumination led in ours console imagine also that you have you die explains of this small touch special that gave him as I always do that what has done is recortar what they are the letters of ps3 the rejilla to the equal that in the entrance of air and afterwards him put also a piece to throw him but in this case of blue colour so that like this it differentiates a poquito to the rest of illumination and good with this create that already is everything expect that it serve you of help to the tutorial or at least that you it have liked and if it is like this as already you know to give us the air likes me that it is not absolutely at all and from here already only it remains to sack and I eat always I say a greeting and will see us very prompt in the next tutorial until prompt [Music] until the sight baby